Single Sign-On - OpenID Connect
Xurrent can act as a relying party that requests user authorization from an OpenID Connect Provider.
OpenID Connect Single Sign-On Transaction Steps

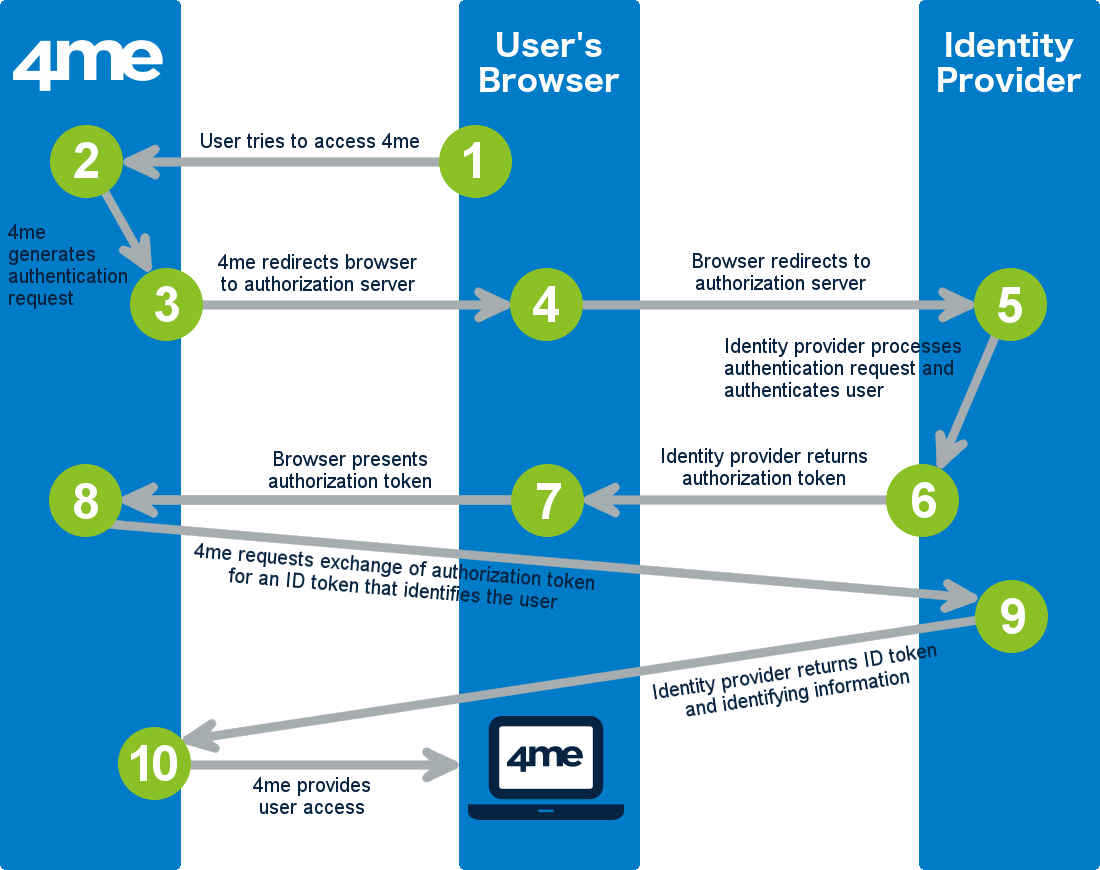
The image above illustrates the following 10 steps that complete one OpenID Connect SSO transaction:
-
The user attempts to access the Xurrent account of his/her organization using a browser application such as Microsoft Internet Explorer, Google Chrome, etc.
-
Xurrent looks up the settings of the Xurrent account of the user’s organization and sees that SSO has been configured in this account. That is why, rather than prompting the user for an email address and password, Xurrent generates an OpenID Connect authentication request. Xurrent then encodes this authentication request and embeds it into a redirect URL that is intended for the SSO service of the identity provider that the user’s organization uses.
-
Xurrent sends the redirect URL to the user’s browser.
-
The user’s browser redirects to the identity provider’s SSO service.
-
The identity provider processes the authentication request. This means the identity provider will ask the user to authenticate. If this is the first time the user is asked to authenticate to access Xurrent the user may be asked by the identity provider to provide consent that Xurrent is allowed to view user information such as name and email address.
-
Once the user has provided consent and has authenticated, the identity provider generates a response that contains an authorization token.
-
The user’s browser forwards the authorization token to Xurrent.
-
Xurrent sends a request directly to the identity provider (bypassing the user’s browser), requesting the identity provider to exchange the authorization token for an ID token that identifies the authenticated user.
-
The identity provider returns an ID token and other identifying information.
-
Xurrent validates the response and checks it against (amongst others) CSRF and replay attacks. If the ‘Allow JIT provisioning’ field is enabled for the SSO configuration of this account, the JIT End User Access Provisioning functionality is triggered to automatically generate a new person record if one does not yet exist with the user’s email address, or to automatically update the user’s person record in Xurrent.
After that, Xurrent redirects the user to the destination URL within the Xurrent account of the user’s organization. The user is now logged in to Xurrent.
How to Enable OpenID Connect SSO for Xurrent
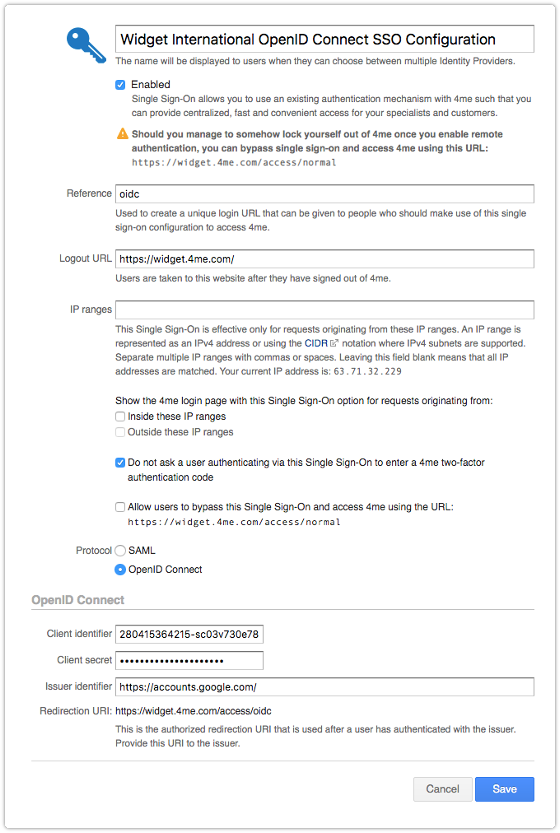
To make OpenID Connect SSO work for an organization’s Xurrent account, the Xurrent account owner will need the following information:
-
the Client identifier
-
the Client secret
-
the Issuer identifier
This information can then be entered by the Xurrent account owner in the Single Sign-On section of the Settings console.

Once SSO has been enabled, the account owner can check whether it works by logging out of Xurrent and subsequently trying to access Xurrent again by going to the URL of the Xurrent account. If the account owner is already logged in to the identity provider, Xurrent nor the identity provider should no longer ask for an email address and password. Instead, the account owner is directly taken to the Xurrent inbox.
